Is your trusty pressure washer sputtering, refusing to start, or simply not performing with its usual vigor? More often than not, the culprit lies within its small but mighty heart: the carburetor. This essential component is responsible for precisely mixing air and fuel, ensuring your engine runs smoothly and efficiently. When it gets dirty, your cleaning projects come to a grinding halt. This comprehensive guide will empower you to tackle a dirty pressure washer carburetor yourself, saving you time and money, and getting your machine back to peak performance.
Understanding Your Pressure Washer Carburetor
The carburetor acts much like the heart of your pressure washer, meticulously blending air and fuel in a precise ratio to power the engine. Without this delicate balance, your machine can’t operate correctly. Over time, this vital component can accumulate grime and deposits, leading to a range of performance issues.
Common Signs of a Dirty Carburetor
Recognizing the symptoms of a clogged carburetor early can save you from more extensive repairs. Keep an eye out for these tell-tale signs:
- Startup Problems: If your pressure washer struggles to start or refuses to kick in at all, a dirty carburetor is a likely cause. A clogged carburetor prevents the proper flow of air and fuel, making ignition difficult.
- Abnormal Engine Sounds: Listen for unusual popping or “sneezing” sounds during operation. These often indicate an imbalance in the air-fuel mixture, directly linked to fuel flow problems in the carburetor.
- Black Exhaust Smoke: The emission of black smoke from your pressure washer’s exhaust pipe signals an overly rich fuel-to-air ratio. Too much fuel is entering the combustion chamber, a common symptom of carburetor issues.
- Rough Running or Stalling: An engine that runs roughly, surges, or stalls shortly after starting suggests an obstructed carburetor. Old, sticky fuel deposits are frequently to blame for this inconsistent performance.
- Low or No Pressure: While often associated with pump issues, a severely clogged carburetor can indirectly lead to low or inconsistent water pressure by hindering the engine’s ability to maintain optimal power output.
What Causes Carburetor Issues?
The primary reason carburetors become dirty or clogged is leaving fuel in the pressure washer’s tank for extended periods. Modern gasoline, especially ethanol-blended varieties, can degrade over time. As volatile components evaporate, they leave behind a thick, gummy residue that can clog the tiny passages and jets within the carburetor. This sticky buildup restricts fuel flow, disrupting the air-fuel mixture and impacting engine performance. Regular use of fresh fuel and proper storage are crucial for prevention.
Essential Tools and Safety Precautions
Before you begin, gather the necessary tools and prioritize your safety. Working with fuel and small engine components requires careful attention.
Necessary Tools
You’ll need a few basic tools and cleaning supplies to successfully clean your pressure washer carburetor:
- Socket Set/Nut Drivers: For removing bolts and fasteners.
- Screwdrivers (Flathead and Phillips): Various sizes for disassembling components.
- Pliers (Needle-Nose recommended): Useful for hoses, clamps, and small parts.
- Carburetor Cleaner Spray: A specialized aerosol cleaner designed to dissolve gum, varnish, and carbon deposits. Brands like CRC, Gumout, or Gunk are popular choices.
- Small Wire or Spiral Tip Cleaners: Essential for clearing out tiny jets and passages. Many carburetor cleaning kits include these.
- Small Brushes: For scrubbing away stubborn grime. An old toothbrush can work for larger surfaces.
- Shop Rags/Clean Cloths: For wiping down parts and absorbing spills.
- Catch Basin/Container: To drain and collect old fuel.
- Personal Protective Equipment (PPE):
- Safety Glasses: To protect your eyes from fuel, cleaner, and debris.
- Chemical-Resistant Gloves: To protect your hands from harsh chemicals and gasoline.
- Face Mask: Recommended when spraying carburetor cleaner in confined spaces.
- Compressed Air (Optional): For thoroughly drying and clearing passages after cleaning.
- Digital Camera/Smartphone: For taking reference photos during disassembly.
Key Safety Measures
Always put safety first when working with your pressure washer’s fuel system:
- Work in a Well-Ventilated Area: Carburetor cleaners and gasoline produce strong fumes. Ensure adequate airflow to prevent inhalation hazards.
- Disconnect Spark Plug: Before touching any engine components, remove the spark plug cap to prevent accidental starting of the engine.
- Ensure Cold Engine: Never work on a hot engine. Allow the pressure washer to cool completely.
- No Open Flames: Gasoline and carburetor cleaners are highly flammable. Keep all sources of ignition (sparks, open flames, hot surfaces) away from your workspace.
- Contain Spills: Have absorbent rags and a suitable container ready to catch any spilled fuel or cleaning agents.
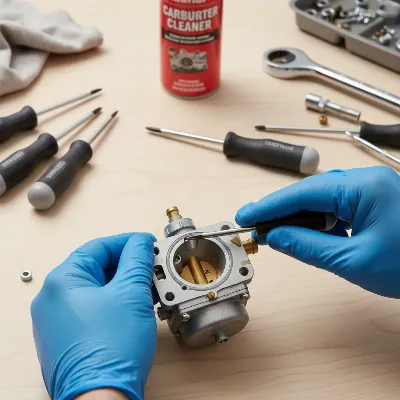 A DIY enthusiast carefully disassembling a pressure washer carburetor on a workbench with tools and safety gloves.
Step-by-Step DIY Carburetor Cleaning
Cleaning your pressure washer’s carburetor can seem daunting, but by following these detailed steps, you can confidently restore its function.
Preparation and Disassembly
Before diving into the cleaning process, careful preparation and methodical disassembly are key to a successful outcome.
- Safety First: Begin by removing the spark plug cap to ensure the engine cannot accidentally start. Next, turn the fuel valve to the “OFF” position to stop fuel flow to the carburetor.
- Access the Carburetor: The carburetor is typically located behind the air filter housing. You’ll likely need to remove the air filter cover, air filter, and possibly the throttle cover and intake assembly to gain clear access. Each pressure washer model may vary slightly, so consult your owner’s manual if unsure.
- Drain the Fuel: Locate the fuel line connecting the fuel tank to the carburetor. Place a catch basin underneath and disconnect the fuel line to drain any remaining gasoline from the tank. You may also need to unscrew the bottom of the carburetor bowl to drain residual fuel directly from the carburetor. Check the drained fuel for rust, stickiness, or consistency issues, which indicate stale fuel.
- Remove the Carburetor: Using a socket wrench or nut driver, carefully unbolt the carburetor from the engine. There are typically two bolts. Disconnect any throttle linkages, springs, or hoses attached to the carburetor. It’s highly recommended to take photos at each step of disassembly. These visual references will be invaluable during reassembly.
- Initial Inspection and Residual Fuel: Once removed, place the carburetor in your catch basin. Check the unit for any remaining fuel and allow it to drain completely. Inspect the exterior for excessive dirt, grime, or corrosion. Severe corrosion might indicate a need for replacement rather than just cleaning.
- Disassemble the Carburetor: This is where your photos become critical. Carefully unscrew the float bowl (the cup-shaped bottom part) and gently remove it, along with the float and needle valve. Then, locate and carefully unscrew the main jet and idle jet. These are usually brass components with tiny holes. Lay all parts out in the order they were removed to simplify reassembly.
Thorough Cleaning Procedures
With the carburetor disassembled, it’s time to get it sparkling clean. This step requires patience and precision.
- Apply Carburetor Cleaner: Generously spray all metal carburetor components with a dedicated carburetor cleaner. Pay special attention to the float bowl, jets, and all tiny passages. Allow the cleaner to soak for the recommended time (usually 10-20 minutes, check product instructions) to break down stubborn varnish and gum deposits. For rubber parts like gaskets and O-rings, avoid harsh chemical cleaners, as they can cause deterioration. Use mild soap and water for these, then rinse thoroughly.
- Clean Jets and Passages: The jets are the most critical parts to clean, as their tiny orifices are easily clogged. Use a small wire or spiral tip cleaner to meticulously clear out the holes in the main jet, idle jet, and any other small passages you can access. Ensure light passes through each hole, confirming they are completely clear. Do not try to enlarge the holes.
- Clean Other Components: Use a small brush (like an old toothbrush) and more carburetor cleaner to scrub the inside of the float bowl, the carburetor body, and any other metal parts. Wipe everything down thoroughly with a clean, dry cloth to remove all dissolved residue and cleaner. If available, a blast of compressed air can help clear passages and dry components completely.
- Inspect for Wear and Tear: As you clean, carefully inspect each part for any signs of damage, such as cracks in plastic, bent needles, or degraded gaskets and O-rings. Replace any worn or damaged components, as these can affect performance even after a thorough cleaning.
Reassembly and Testing
Putting everything back together correctly is just as important as the cleaning itself. Take your time and refer to your photos.
- Reassemble the Carburetor: Working in reverse order of disassembly, carefully reassemble the carburetor. Start by screwing the main jet and idle jet back into place. Then, reinsert the needle valve and float, ensuring they move freely. Finally, attach the float bowl, making sure the O-ring or gasket is properly seated to prevent leaks. Do not overtighten screws or bolts.
- Reinstall on Engine: Mount the cleaned and reassembled carburetor back onto the pressure washer engine. Reconnect all throttle linkages, springs, and hoses that you removed earlier. Fasten the carburetor bolts securely, then reattach the air filter housing and air filter.
- Reconnect Fuel and Spark Plug: Reconnect the fuel line to the carburetor. Turn the fuel valve back to the “ON” position. Finally, reattach the spark plug cap.
- Initial Start-Up and Leak Check: Before starting the engine, carefully inspect around the carburetor for any fuel leaks. Once you’re sure there are no leaks, attempt to start the pressure washer. It might take a few pulls to prime the system with fresh fuel. Listen for smooth engine operation and check for any remaining symptoms.
When to Seek Professional Help or Consider Replacement
While DIY cleaning is effective for many clogged carburetors, there are situations where professional assistance or even replacement is necessary.
If, after a thorough cleaning, your pressure washer continues to exhibit startup problems, rough running, or other performance issues, the carburetor might have internal damage beyond simple clogs. Extensive corrosion, irreparable damage to the float or needle valve, or stripped threads can prevent proper function. In such cases, attempting further repairs yourself might be counterproductive. A local small engine repair technician can diagnose the problem accurately and advise on whether a carburetor rebuild kit can resolve the issue or if a complete replacement is the most cost-effective solution. Sometimes, particularly with older or less expensive models, replacing the entire carburetor assembly is simpler and more reliable than trying to rebuild it.
Preventing Future Carburetor Problems
Proactive maintenance is the best defense against a dirty pressure washer carburetor. By adopting a few simple habits, you can significantly extend the life of your engine and avoid common fuel-related issues.
The most critical step in prevention is proper fuel management. Always avoid leaving gasoline in your pressure washer’s tank for extended periods, especially during off-season storage. Gasoline, particularly ethanol-blended varieties, can degrade rapidly, leaving behind sticky varnish and gum deposits that readily clog the carburetor’s delicate passages. If you must store your pressure washer for more than 30 days, it’s best to drain the fuel tank completely and run the engine until it runs out of fuel. Alternatively, use a high-quality fuel stabilizer, following the manufacturer’s instructions, to keep the fuel fresh and prevent degradation. Always use fresh gasoline for your pressure washer. Regular checks of your fuel filter and air filter also contribute to overall engine health, ensuring clean fuel and air reach the carburetor.
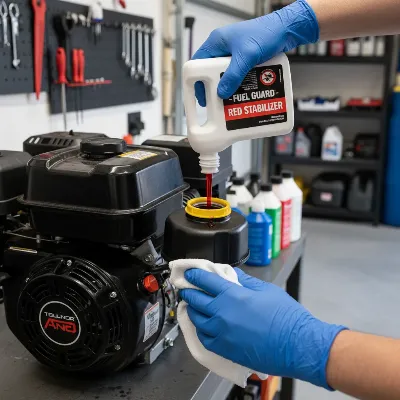 A bottle of fuel stabilizer being poured into a pressure washer fuel tank for preventative maintenance.
Conclusion
A dirty carburetor can quickly render your pressure washer ineffective, but with a bit of patience and the right tools, you can often restore its functionality yourself. By understanding the symptoms, meticulously following the cleaning steps, and prioritizing safety, you’ll ensure your machine is ready for any cleaning challenge. Remember, consistent maintenance, especially regarding fuel storage, is your best ally in preventing future carburetor headaches. What upcoming cleaning project will you tackle now that your pressure washer is running smoothly?
Frequently Asked Questions
Why does old fuel cause carburetor problems?
Old fuel, especially ethanol-blended gasoline, can break down and leave behind sticky residues and varnish. These deposits then clog the tiny jets and passages within the carburetor, disrupting the air-fuel mixture and preventing the engine from running correctly.
Can I clean a pressure washer carburetor without removing it?
While it is possible to attempt a superficial cleaning by spraying carburetor cleaner into the intake while the engine is running, a thorough cleaning usually requires removing and disassembling the carburetor to access all clogged jets and passages.
How often should I clean my pressure washer’s carburetor?
The frequency depends on usage and fuel storage. If you use fresh fuel and store your machine properly, cleaning might only be needed every few years. However, if symptoms of a dirty carburetor appear, it’s best to address it immediately.
What’s the difference between carburetor cleaner and brake cleaner?
Both are strong solvents, but carburetor cleaner is specifically formulated to dissolve fuel system deposits like gum and varnish, and some are safer for rubber and plastic components. Brake cleaner is primarily for removing grease and oil from brake parts and may be too aggressive for delicate carburetor seals.
What should I do if cleaning doesn’t fix the problem?
If a thorough cleaning doesn’t resolve the performance issues, the carburetor might have internal damage that requires a rebuild kit or a complete replacement. In such cases, consulting a small engine repair professional is recommended for accurate diagnosis and repair.
Get our weekly buyer guide
Practical specs, not advice. Unsubscribe anytime.