A pressure washer can be an incredibly powerful tool for tackling tough cleaning jobs, from blasting grime off your driveway to revitalizing your patio. However, nothing halts a productive cleaning session faster than a clogged pressure washer nozzle. When your machine suddenly loses power, sprays unevenly, or stops spraying altogether, a blocked nozzle is often the culprit, turning a simple task into a frustrating ordeal. Fortunately, you don’t always need professional help or expensive tools to get back on track. This comprehensive DIY guide will walk you through understanding why your nozzle clogs, the essential tools you’ll need, and a simple, step-by-step process to quickly unclog your pressure washer nozzle and restore its peak performance.
Understanding Why Your Pressure Washer Nozzle Clogs
Pressure washer nozzles are precision components designed to force water through a tiny opening, creating the high-pressure spray you rely on. Over time, these small orifices can become obstructed, leading to a significant drop in performance. Recognizing the causes and signs of a clog is the first step toward effective troubleshooting.
The most common reason for a pressure washer nozzle to clog is the accumulation of hard water deposits. Tap water, especially in certain regions, contains minerals like calcium and magnesium. These minerals can adhere to the inside of the nozzle, gradually constricting the water flow. Similarly, rust particles, dirt, sand, and other fine debris present in unfiltered water sources or introduced through a dirty hose can also build up, forming a blockage. Even residues from cleaning chemicals or detergents used in your pressure washer can contribute to clogs if not properly flushed out. Furthermore, a worn or damaged nozzle can create irregular surfaces inside the orifice, making it more prone to trapping debris and accelerating mineral buildup. For pressure washer buying guides on this site.
The signs of a clogged nozzle are usually quite noticeable. You might observe a reduced water flow or a weak, inconsistent spray pattern that looks lopsided or irregular instead of a uniform fan or stream. In severe cases, there might be no water coming out of the nozzle at all. Other indicators include the pressure washer motor pulsing or vibrating excessively, as the pump struggles to force water through the obstruction, creating back pressure in the system. If you notice streaks, swirls, or uneven cleaning on the surface you’re working on, it’s a strong signal that your nozzle is partially blocked and not distributing water evenly.
Essential Tools for a Quick Nozzle Unclogging
Before you begin the unclogging process, it’s helpful to gather a few basic tools. Most of these items are readily available around your home or can be easily purchased, making the DIY approach both convenient and cost-effective. Having everything on hand ensures a smooth and efficient cleaning operation.
First and foremost, a nozzle cleaning tool or a nozzle cleaning pin is highly recommended. Many pressure washer manufacturers include a small, thin wire tool with their units, often stored directly on the machine. This specialized tool is designed to precisely fit into the nozzle orifice without causing damage. If you don’t have one, a very thin, stiff wire, such as a sewing needle or a safety pin, can be used with extreme caution, ensuring it is smaller than the nozzle opening and not excessively sharp to avoid scratching or widening the orifice.
Next, white vinegar is an invaluable asset, especially for dissolving mineral and hard water deposits. Its acidic properties make it an excellent natural descaler. You’ll need a small bowl or cup to soak the nozzle in. For your personal protection, always wear safety goggles to shield your eyes from any unexpected spray or dislodged debris, and gloves to protect your hands, particularly when handling cleaning solutions or sharp objects. A garden hose or access to running water is crucial for flushing out debris. Depending on your pressure washer model, a small brush might be useful for cleaning the exterior of the nozzle, and a wrench or socket could be necessary to remove certain types of nozzles, particularly those on surface cleaners, from the spray bar.
Step-by-Step DIY Guide to Unclogging a Pressure Washer Nozzle
Tackling a clogged pressure washer nozzle can seem daunting, but with a systematic approach, it’s a quick and simple fix. Always prioritize safety, then follow these steps to restore your pressure washer to full power. This process aims to address common clogs efficiently using tools you likely already possess.
Prioritize Safety: Disconnect and Depressurize
|
Our Picks for the Best Pressure Washer in 2026
As an Amazon Associate I earn from qualifying purchases.
|
||
| Num | Product | Action |
|---|---|---|
| 1 | Westinghouse ePX3050 Electric Pressure Washer, 2100 Max PSI 1.76 Max GPM with Foam Cannon and Turbo Nozzle, for Cars/Fences/Driveways/Home/Patios |

|
| 2 | Pressure Washer -4800PSI Power Washer with 4 Quick Connect Nozzles, High Pressure Cleaning Machine with Foam Cannon for Car/Garage/Patio Home Cleaning |
|
| 3 | Pressure Washer, Portable Power Washer, 4 Quick Connect Nozzles, High Pressure Cleaning Machine for Car Fence Driveway Patio Washing and More |
|
| 4 | Electric Pressure Washer, 2.5 GPM Power Washer with Foam Cannon, Electric High Pressure Washer with 4 Quick Connect Nozzles for Cars, Driveways, Fences, Patios, Home Cleaning |
|
| 5 | Westinghouse ePX3100v Electric Pressure Washer, 2100 Max PSI 1.76 Max GPM, Built-in Carry Handle, Detachable Foam Cannon, Pro-Style Steel Wand, 3-Nozzle Set, for Cars/Fences/Driveways/Home/Patios |
|
| 6 | LawnMaster Electric Pressure Washer with Detergent Bottle |
|
| 7 | Pressure Washer Power Washer with 4500MAX-PSI, 4 Nozzles, Foam Cannon for Cleaning Cars, Driveways, Patios(Green) |
|
| 8 | Westinghouse ePX3100 Electric Pressure Washer, 2300 Max PSI 1.76 Max GPM with Anti-Tipping Technology, Onboard Soap Tank, Pro-Style Steel Wand, 5-Nozzle Set, for Cars/Fences/Driveways/Home/Patios |
|
| 9 | Pressure Washer, Power Washer with 4 Quick Connect Nozzles 1 Foam Cannon, Pressure Cleaning Machine for Cars/Fences/Driveways/Patios/Home Cleaning |
|
| 10 | Westinghouse ePX3500 Electric Pressure Washer, 2500 Max PSI 1.76 Max GPM with Anti-Tipping Technology, Onboard Soap Tank, Pro-Style Steel Wand, 5-Nozzle Set, for Cars/Fences/Driveways/Home/Patios |
|
Before touching any part of your pressure washer, especially the nozzle, it is paramount to ensure the machine is completely safe to handle. First, turn off the power switch on your pressure washer. If it’s an electric model, unplug the power cord from the outlet. For gas-powered units, turn off the engine and remove the spark plug wire to prevent accidental starts. Once the power is off, release any residual pressure in the system by squeezing the trigger on the spray gun a few times. You should hear a hiss of water as the pressure dissipates. This crucial step prevents accidental water discharge and potential injury, creating a secure environment for maintenance.
Remove and Inspect the Clogged Nozzle
With the pressure washer safely depowered and depressurized, you can now remove the nozzle. Most pressure washer nozzles are designed for quick attachment and detachment. Simply twist or pull the nozzle directly off the spray wand, or if it’s part of a quick-connect system, pull back the collar to release it. On some specialized attachments, like surface cleaners, you might need a wrench or socket to unthread the nozzles from the spray bar. Once removed, visually inspect the nozzle orifice—the small hole where the water exits. Look closely for any visible debris, such as dirt, sand, mineral chunks, or rust. Sometimes, the blockage is obvious and sitting right at the opening.
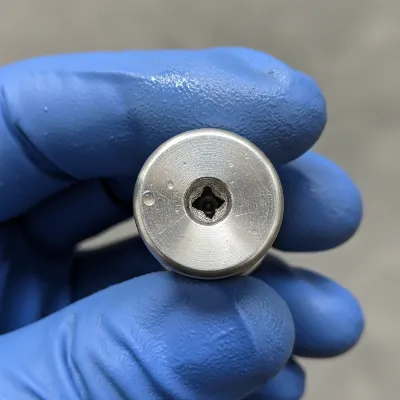 A close-up of a pressure washer nozzle being inspected for clogs, with a focus on the small opening.
Mechanical Clearing with a Cleaning Tool
This step involves physically dislodging any solid obstructions within the nozzle. Take your dedicated nozzle cleaning tool or the thin wire you’ve chosen (like a sewing needle). Carefully insert the cleaning tool into the nozzle opening. Gently work the wire back and forth, and if necessary, with a slight circular motion, to probe the interior of the nozzle. The goal is to break up and push out any lodged debris, not to enlarge or damage the nozzle’s precise opening. Be cautious and avoid applying excessive force, as this could permanently alter the spray pattern or damage the nozzle, making it unusable. If your pressure washer came with a cleaning pin, always opt for that over other improvised tools to ensure the best fit and prevent damage.
Flush Out Loose Debris
After mechanically clearing the nozzle, it’s essential to flush out any loosened debris. Take the nozzle and hold it under running water from a garden hose or a faucet. For best results, try to direct the water flow backwards through the nozzle—that is, from the side that connects to the wand, towards the small orifice. This reverse flow helps to push any remaining particles out of the nozzle’s opening more effectively. Continue flushing for about 30 seconds to a minute, ensuring all dislodged grit and grime are completely washed away. This step is critical for a thorough cleaning and prevents immediate re-clogging once the nozzle is reattached.
Dissolve Stubborn Mineral Buildup (Vinegar Soak)
If the nozzle is still partially clogged, or if you suspect hard water deposits are the primary issue, a white vinegar soak is an effective solution. White vinegar contains acetic acid, which is excellent at dissolving mineral buildup. Place the nozzle in a small bowl or cup and pour enough white vinegar to completely submerge the nozzle. Allow it to soak, ideally overnight, or for at least a few hours. For more severe calcium deposits, a longer soak can be beneficial. After soaking, remove the nozzle and repeat the mechanical clearing step with the cleaning tool, followed by a thorough flush under running water. This combination of chemical dissolution and mechanical action often resolves even the most stubborn clogs.
Reassemble and Test for Proper Operation
Once you are confident the nozzle is clean and clear, it’s time to reattach it to your pressure washer. Securely reinstall the nozzle onto the spray wand, ensuring it clicks into place or is threaded tightly, depending on your model. If you removed it from a surface cleaner, ensure the nozzle opening is properly aligned and parallel to the spray bar. Double-check all connections to prevent leaks. Then, reconnect the pressure washer to its water supply and power source. Start the pressure washer and test the spray pattern and pressure. If the cleaning was successful, you should observe a strong, consistent, and even spray, indicating that your pressure washer is back to performing at its best.
Advanced Troubleshooting for Stubborn Nozzle Clogs
Sometimes, standard cleaning methods aren’t enough to dislodge a particularly stubborn clog. In such cases, a few advanced techniques can be employed to restore full functionality to your pressure washer nozzle. These methods require a bit more caution and understanding of your equipment.
One effective technique is backflushing the nozzle. This involves forcing water in the opposite direction of normal flow to push out blockages. After removing the nozzle, you can attempt to hold it firmly against a running garden hose, allowing the water pressure to push through the orifice from the outside in. For surface cleaner nozzles, some models allow you to turn on the water supply (without starting the pressure washer) and squeeze the trigger to flush water through the spray bar and out the nozzle openings in reverse for about 30 seconds. This can dislodge internal debris that regular flushing might miss.
Another option is using compressed air. If available, a can of compressed air or an air compressor can be used to blow air directly into the nozzle, again from the outside (the spray end) towards the inside (the connection end). This high-velocity air can often dislodge particles that are too stubborn for water or a cleaning wire. However, exercise extreme caution when using compressed air. Always wear eye protection and ensure the nozzle is held securely. Never point the nozzle towards yourself or others when using compressed air, as dislodged debris can be propelled at high speeds.
If, after trying all cleaning and troubleshooting methods, your nozzle still produces an uneven spray, reduced pressure, or no flow, it might be time to consider nozzle replacement. Nozzles are consumable parts and can wear out over time, especially from constant high-pressure water flow and the abrasive action of particles. A worn orifice will result in an altered spray pattern and decreased efficiency, even if it’s not strictly “clogged.” Most manufacturers recommend replacing nozzles after 400-500 hours of commercial use or annually for homeowners. Keeping a spare set of nozzles is a wise investment to minimize downtime.
Preventing Future Pressure Washer Nozzle Clogs
The best way to deal with a clogged pressure washer nozzle is to prevent it from happening in the first place. Incorporating a few simple maintenance habits into your routine can significantly extend the life of your nozzles and ensure your pressure washer is always ready for action. Proactive care is key to consistent performance and hassle-free cleaning.
The most critical preventive measure is to install and maintain water filters. Many pressure washers come with an inline filter or a strainer at the water inlet, designed to catch larger debris before it enters the pump and reaches the nozzle. Regularly inspect and clean this filter to ensure it’s free of accumulated particles. If your pressure washer doesn’t have one, consider purchasing an aftermarket inline filter, especially if you’re drawing water from an outdoor spigot or an older water source that might contain sediment. A clean filter is your first line of defense against clogs.
Furthermore, make it a habit to flush your system after every use. Before storing your pressure washer, run clean water through the entire system for a few minutes. This flushes out any residual detergents, chemicals, or microscopic particles that could dry and form clogs. Similarly, proper storage techniques contribute to longevity. Always drain all water from the pump, hoses, and spray gun before storing the unit, especially in freezing temperatures, to prevent damage and mineral buildup. Store the nozzle cleaning tool with your pressure washer so it’s always handy for quick checks.
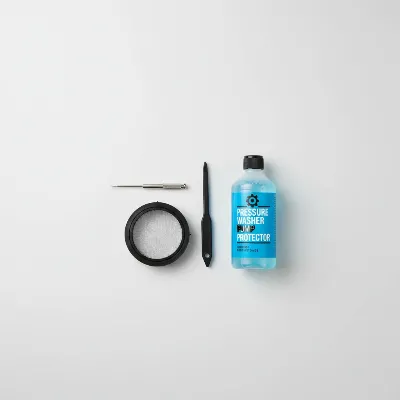 A maintenance kit for a pressure washer, including a nozzle cleaning tool, a small brush, and a water filter, displayed neatly.
Regular nozzle inspection and cleaning are also essential. Whenever you notice a slight reduction in pressure or an uneven spray, take a moment to clean the nozzle even if it’s not fully clogged. This proactive approach prevents small buildups from becoming major obstructions. Finally, always use clean, potable water sources whenever possible. Avoiding stagnant water or sources known to have high sediment content will significantly reduce the risk of introducing debris into your pressure washer system and, consequently, into your nozzles. By following these simple tips, you can enjoy uninterrupted, high-performance cleaning for years to come.
Common Mistakes to Avoid When Unclogging Nozzles
While unclogging a pressure washer nozzle is a straightforward DIY task, certain missteps can lead to further damage, reduced performance, or even personal injury. Being aware of these common mistakes can save you time, money, and frustration in the long run. Adhering to best practices ensures both the effectiveness of your cleaning and the longevity of your equipment.
One of the most frequent errors is using inappropriate tools to clear the nozzle. While a thin wire or sewing needle can be a temporary substitute for a dedicated cleaning tool, using objects that are too thick, too sharp, or made of a harder material than the nozzle can permanently damage the precision orifice. This can result in a widened hole, leading to reduced pressure, an irregular spray pattern, and accelerated wear. Never force a tool into the nozzle, and avoid using items like paperclips, screwdrivers, or drill bits unless specifically designed for nozzle cleaning, as these can easily distort the nozzle’s shape.
Another critical mistake is ignoring safety protocols. Skipping the crucial step of turning off the pressure washer, unplugging it, and depressurizing the system before handling the nozzle can lead to accidental discharge of high-pressure water, which can cause severe injury. Always wear safety goggles to protect your eyes from dislodged debris or chemical splashes, and gloves to protect your hands. Rushing through the process or being careless with tools can also result in cuts or scrapes, making a simple repair unnecessarily risky.
Finally, neglecting regular maintenance is a mistake that often leads to repeated clogs. Believing that a one-time unclogging is sufficient without addressing the underlying causes will only result in recurrent issues. Failing to use water filters, not flushing the system after each use, or ignoring minor signs of clogging will allow debris and mineral deposits to build up again. Consistent preventative maintenance, as outlined in the previous section, is far more effective than constantly reacting to full-blown clogs. By integrating these habits, you can keep your nozzles clear and your pressure washer performing optimally.
Conclusion
Dealing with a clogged pressure washer nozzle can be a momentary nuisance, but it doesn’t have to derail your cleaning plans. By understanding the common culprits—from hard water buildup to external debris—and recognizing the warning signs, you’re already halfway to a solution. The good news is that most clogs can be resolved quickly and effectively using simple DIY methods, primarily involving a dedicated cleaning tool and the power of white vinegar. Always remember to prioritize safety by disconnecting power and releasing pressure before you begin.
Regular maintenance, such as using water filters, flushing your system after each use, and consistent inspection, is your best defense against future blockages, keeping your equipment running smoothly and efficiently. While a quick fix is satisfying, a proactive approach ensures longevity and consistent performance. So, the next time your pressure washer falters, confidently apply these techniques and get back to tackling those tough cleaning tasks with full power. What other small maintenance tasks do you find make the biggest difference in your outdoor power equipment?
Frequently Asked Questions
How often should I clean my pressure washer nozzle?
It’s recommended to clean your pressure washer nozzle whenever you notice reduced water flow, an uneven spray pattern, or a decrease in overall pressure. For frequent users, a quick check and flush after every few uses or at the end of a major cleaning project can prevent significant clogs from forming. Consistent preventative maintenance is key.
Can I use a paperclip to unclog my nozzle?
While a paperclip might seem like a convenient substitute, it is generally not recommended. Paperclips can be too soft or too thick, potentially bending inside the nozzle or scratching and widening the precision orifice, which can permanently damage the spray pattern and reduce pressure. Always try to use the cleaning pin supplied with your pressure washer or a dedicated nozzle cleaning tool.
What happens if I don’t clean a clogged nozzle?
Ignoring a clogged nozzle can lead to several problems. It significantly reduces cleaning effectiveness due to uneven spray and low pressure. More importantly, it can put excessive strain on your pressure washer’s pump, forcing it to work harder against the obstruction. This increased stress can lead to premature wear and tear, costly repairs, or even pump failure over time.
How do I know if my nozzle needs to be replaced?
Your nozzle likely needs to be replaced if, after thorough cleaning and troubleshooting, you still experience an uneven spray pattern, inconsistent pressure, or visible damage like cracks, widening, or pitting in the orifice. Nozzles are consumables that wear out. A general guideline is to replace them every 400-500 hours of use for commercial machines or annually for homeowners, even without a visible clog.
Get our weekly buyer guide
Practical specs, not advice. Unsubscribe anytime.